Test in a live environment
Test in production without watermarks.
Works wherever you need it to.
The Python PDF Library


What is the closest thing resembling the superpower clairvoyance in reality? It’s the ability to make predictions based on data structured in graphs. At its core, this involves interpreting information as nodes and edges, where the relationships and interactions within the graph provide valuable insights. Unlike traditional methods that focus on tabular or sequential data representations, graph machine learning workflows leverage these connections to uncover hidden patterns.
This is why graph convolutional neural networks (GCNs) and graph attention-based methods have been adapted for graph data, enabling machine learning models to tackle tasks such as node classification, sequence prediction, link prediction, and graph categorization. These techniques are especially beneficial in domains requiring a nuanced understanding of complex relationships, empowering systems to make accurate predictions or derive profound insights, particularly in areas like social networks and recommender systems.
In this article, we are going to use Stellargraph to generate a graph and then convert it into a PDF file with the help of Ironpdf.
StellarGraph is a Python library designed for machine learning with graph-structured data. It provides a comprehensive set of tools for creating, manipulating, and visualizing graphs. Additionally, StellarGraph offers advanced graph-based machine-learning algorithms tailored for learning from and analyzing complex graph data, which includes knowledge graph completion.
StellarGraph supports tasks such as node classification, link prediction, and graph classification through its implementation of models like Graph Convolutional Networks and Graph Attention Networks.
It is also integrated with several popular graph machine learning workflows, such as TensorFlow and Keras, making it a good solution for the analysis and finding of insights from complex networks in most fields like social networks, bioinformatics, and recommendation systems.
To generate a graph using StellarGraph, you will be guided through the installation of the libraries, creation of the graph, definition of node and edge features, and finally the setup of a machine learning model. Here is a step-by-step guide to get you started:
You first will want to make sure that the following libraries are installed correctly, below also shows the commands used to install them if you haven't already:
pip install stellargraph
pip install tensorflow
pip install pandas
pip install numpyA simple example of defining a graph, adding edge and node features with the help of the numerous algorithms which is included in the Stellargraph:
import pandas as pd
import numpy as np
from stellargraph import StellarGraph
from stellargraph.layer import GCN
from stellargraph.mapper import FullBatchNodeGenerator
import matplotlib.pyplot as plt
import networkx as nx
# Step 1: Create Sample Graph Data
nodes = pd.DataFrame({
    "feature1": np.random.randn(5),
    "feature2": np.random.randn(5)
}, index=[f"node{i}" for i in range(5)])
# Loading data
edges = pd.DataFrame({
    "source": ["node0", "node1", "node2", "node3"],
    "target": ["node1", "node2", "node3", "node4"]
})
# Step 2: Create StellarGraph Object
G = StellarGraph(nodes=nodes, edges=edges)
# Step 3: Define and Visualize the Graph
# Plot the graph
fig, ax = plt.subplots(figsize=(8, 6))
pos = {node: (np.cos(2 * np.pi * i / len(G.nodes())), np.sin(2 * np.pi * i / len(G.nodes())))
       for i, node in enumerate(G.nodes())}
#computing embedding vectors for nodes and edges
nx.draw(G.to_networkx(), pos, with_labels=True, node_color='lightblue', edge_color='grey', node_size=500, font_size=10, ax=ax)
plt.title('StellarGraph Visualization')
plt.savefig('graph.png')  # Save the visualization as an image
plt.close()The example shown illustrates how to construct a graph and its simple visualization using the StellarGraph library in conjunction with the Matplotlib and Networkx libraries. The example starts by importing the necessary libraries: pandas, Numpy for handling data; StellarGraph for creating the graph structure itself; and Matplotlib and Networkx for visualization.
First, graph data is sampled. In this example, we have the nodes DataFrame with random feature values for five nodes with identifiers node0 through node4. The edges DataFrame describes edges; it contains source-target pairs describing the nodes that are connected.
Then, an instance of the StellarGraph class is created with the node and edge data, which stores this structure of data stored in the graph.
Finally, it visualizes this graph. It provides a function to compute a circular layout for the placement of nodes, where each node is placed according to polar coordinates. The Networkx library then converts this StellarGraph object into a Networkx graph, which is then plotted by Matplotlib. The nodes are light blue, the edges are grey, the graph is labelled and, finally, customized in terms of size and font. Finally, the plot is saved as an image file named graph.png, and the plotting window is closed.
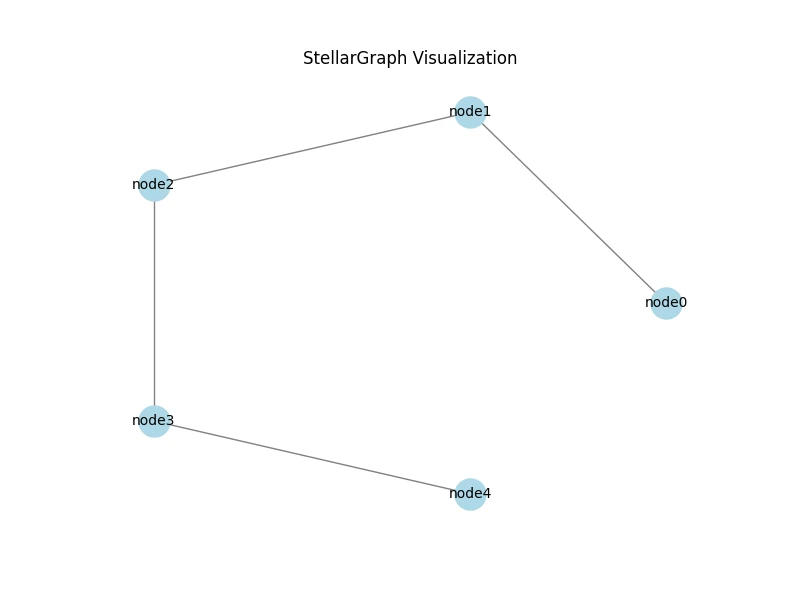
This workflow allows the creation, representation learning, and visualization of a graph. This makes it much easier to perform analyses and present data that are based on graphs.
The IronPDF for Python module allows the programmatic creation and editing of PDFs. You'll be able to generate PDFs from HTML, merge multiple PDF files into one, and even make use of existing PDFs that have text, photos, and annotations added. In contrast, IronPDF enables the production of quality PDFs from any website written in HTML or other Internet content generated in creating reports, invoices, or other documents previously styled.
Some of its advanced features are page layout editing, document encryption, content extraction from a PDF, and many more. Improving how your products deal with PDFs will better place developers to improve their overall utility.
Below is the package installer command that allows Python to enable the use of IronPDF in your projects:
pip install ironpdfBelow is the code to generate a PDF from the graph image created by Stellargraph.
import pandas as pd
import numpy as np
from stellargraph import StellarGraph
from stellargraph.layer import GCN
from stellargraph.mapper import FullBatchNodeGenerator
import matplotlib.pyplot as plt
import networkx as nx
from ironpdf import *     import warnings
warnings.filterwarnings('ignore')
# Ensure that you have replaces the string with your own license key
License.LicenseKey = "YOUR LICENSE KEY GOES HERE";
# Step 1: Create Sample Graph Data
nodes = pd.DataFrame({
    "feature1": np.random.randn(5),
    "feature2": np.random.randn(5)
}, index=[f"node{i}" for i in range(5)])
edges = pd.DataFrame({
    "source": ["node0", "node1", "node2", "node3"],
    "target": ["node1", "node2", "node3", "node4"]
})
# Step 2: Create StellarGraph Object
G = StellarGraph(nodes=nodes, edges=edges)
# Step 3: Define and Visualize the Graph
# Plot the graph
fig, ax = plt.subplots(figsize=(8, 6))
pos = {node: (np.cos(2 * np.pi * i / len(G.nodes())), np.sin(2 * np.pi * i / len(G.nodes())))
            for i, node in enumerate(G.nodes())}
# Draw the graph using NetworkX
nx.draw(G.to_networkx(), pos, with_labels=True, node_color='lightblue', edge_color='grey', node_size=500, font_size=10, ax=ax)
plt.title('StellarGraph Visualization')
# Save the visualization as an image
plt.savefig('graph.png')
plt.close()
# Step 4: Convert the image to PDF using IronPDF
ImageToPdfConverter.ImageToPdf('graph.png').SaveAs("result.pdf")This is a code snippet for the creation and visualization of a graph through the StellarGraph library, then turning the drawn visualization into a PDF using IronPDF. It starts by importing the necessary libraries and setting an IronPDF license key. The sample graph data is generated with random features for nodes and specified edges. Using this data, the StellarGraph object is created. The NetworkX library visualizes the graph in a circular layout and saves it as a PNG image. Afterwards, this PNG image is converted into a PDF document by theImageToPdfConverter of IronPDF.

A licensing key is needed to allow the code to work without a watermark. You can register for a free trial license at this link. Note that we can register one without having to disclose our identity. We just need to enter your email address to be able to sign up and get the free trial version.
Integration of StellarGraph with IronPDF opens up an advanced and strong pathway to assess data and process documents. StellarGraph will contribute powerful graph machine-learning techniques for the analysis of interconnected data, and IronPDF will offer complete tools for handling and manipulating PDF documents. The interaction of these will allow you to extract meaningful insights from complicated data structures within a PDF document.
Their combination empowers enterprises to merge the power of graph-based analytics with sophisticated document handling, thus establishing a much more efficient and insightful data processing workflow. This integration has made another huge step toward full exploitation of the data enclosed in the PDF format and opened new paths of innovation and optimization in quite distinct domains. Iron Software also makes it possible to create apps on many platforms and operating systems, such as Windows, Android, MAC, and Linux, among others, by using many libraries.

pip install ironpdf-2025.4-py37-none-win_amd64.whiNo credit card required
Your trial key should be in the email.![]() The trial form was submitted
The trial form was submitted
successfully.
If it is not, please contact
support@ironsoftware.com
No credit card required

Get started for FREE
No credit card required
Test in production without watermarks.
Works wherever you need it to.
Get 30 days of fully functional product.
Have it up and running in minutes.
Full access to our support engineering team during your product trial


![]() No credit card or account creation required
No credit card or account creation required
Your trial key should be in the email.
If it is not, please contact
support@ironsoftware.com
Get started for FREE
No credit card required
Test in production without watermarks.
Works wherever you need it to.
Get 30 days of fully functional product.
Have it up and running in minutes.
Full access to our support engineering team during your product trial
Licenses from $749. Have a question? Get in touch.

Book a 30-minute, personal demo.
No contract, no card details, no commitments.


10 .NET API products for your office documents