Test in production without watermarks.
Works wherever you need it to.
Get 30 days of fully functional product.
Have it up and running in minutes.
Full access to our support engineering team during your product trial
In modern web applications, ensuring data security and privacy is crucial. One effective way to protect sensitive information like database IDs or URLs is by using Hashids, a JavaScript encryption library that transforms numeric data into unique, reversible, and encrypted hashes. This article explores how you can seamlessly integrate Hashids into your React application to obfuscate and decode identifiers.
Hashids is a small yet powerful library that converts numeric data into a hash string. The primary goal is to obscure numerical identifiers to prevent the exposure of sensitive information. This transformation is reversible, allowing the original numeric data to be retrieved when needed. Hashids is a JavaScript library to generate YouTube-like IDs from numbers, encode sensitive data or expose your database IDs to the user securely or just obfuscate IDs from numbers.
To integrate Hashids into your React application, follow these steps:
First, install Hashids via npm in your React project:
npm install hashids
or
yarn add hashidsIn your React component or utility file, initialize a new Hashids instance with a salt and optionally a minimum hash length:
import { useState, useEffect } from 'react';
import Hashids from 'hashids';
const MyComponent = () => {
  const [hashids, setHashids] = useState(null);
  useEffect(() => {
    const initHashids = new Hashids('your_salt_here', 8); // Replace 'your_salt_here' with your actual salt or configure custom alphabet
    setHashids(initHashids);
  }, []);
  // Other component logic here
  return (
    <div>
      {/* Your JSX content */}
    </div>
  );
};
export default MyComponent;Replace `'your_salt_here'` with a unique string (salt) that you use to customize the hash output.
Once initialized, you can use Hashids to encode and decode numeric data. For instance, encoding a database ID:
const encodedId = hashids.encode(12345); // Example: 'B0zGbvA9' non sequential idsAnd decoding it back to the original ID:
const decodedIds = hashids.decode('B0zGbvA9'); // Example: [12345]Integrate Hashids within your React components where necessary. For example, passing hashed IDs as props:
const MyComponent = ({ id }) => {
  const encodedId = hashids ? hashids.encode(id) : '';
  return (
    <div>
      <p>Encoded ID: {encodedId}</p>
      {/* Other JSX content */}
    </div>
  );
};Security: Hashids obscures numeric IDs, enhancing data privacy and security tool preventing direct mapping to sensitive information.
Ease of Integration: Simple npm installation and straightforward API make Hashids easy to implement in React applications.
IronPDF for Node.js is a powerful Node.js PDF library from Iron Software that allows developers to generate and edit PDFs in their .NET projects. Whether you need to create PDFs from HTML, manipulate existing PDFs, or convert web pages to PDF format, IronPDF has got you covered.

Convert HTML content into PDF documents effortlessly. This feature is particularly useful for generating dynamic PDFs from web content.
Generate PDFs directly from URLs, allowing you to capture the content of web pages and save them as PDF files programmatically.
Merge, split, and manipulate existing PDF documents with ease. IronPDF provides functionalities such as appending pages, splitting documents, and more.
Secure your PDF documents by encrypting them with passwords or applying digital signatures. IronPDF offers options to protect your sensitive documents from unauthorized access.
Produce high-quality PDF documents with precise rendering of text, images, and formatting. IronPDF ensures that your generated PDFs maintain fidelity to the original content.
IronPDF is compatible with various platforms, including Windows, Linux, and macOS, making it suitable for a wide range of development environments.
Easily integrate IronPDF into your Node.js applications using its npm package. The API is well-documented, making it straightforward to incorporate PDF generation capabilities into your projects.
To install the IronPDF NPM package, use the following command:
yarn add @ironsoftware/ironpdf @ironsoftware/ironpdf-engine-windows-x64Install Dependencies: First, create a new Next.js project (if you haven’t already) using the following command: Refer here
npx create-next-app@latest hashids-pdf --use-npm --example "https://github.com/vercel/next-learn/tree/main/basics/learn-starter"Next, navigate to your project directory:
cd hashids-pdfInstall the required packages:
yarn add @ironsoftware/ironpdf @ironsoftware/ironpdf-engine-windows-x64
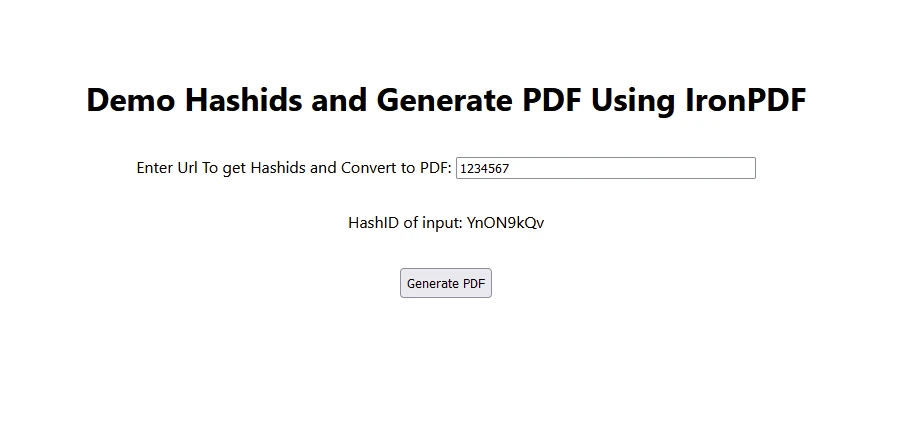
yarn add hashidsNow, let’s create a simple example of generating a PDF using IronPDF. In your Next.js component (e.g., pages/index.tsx), add the following code:
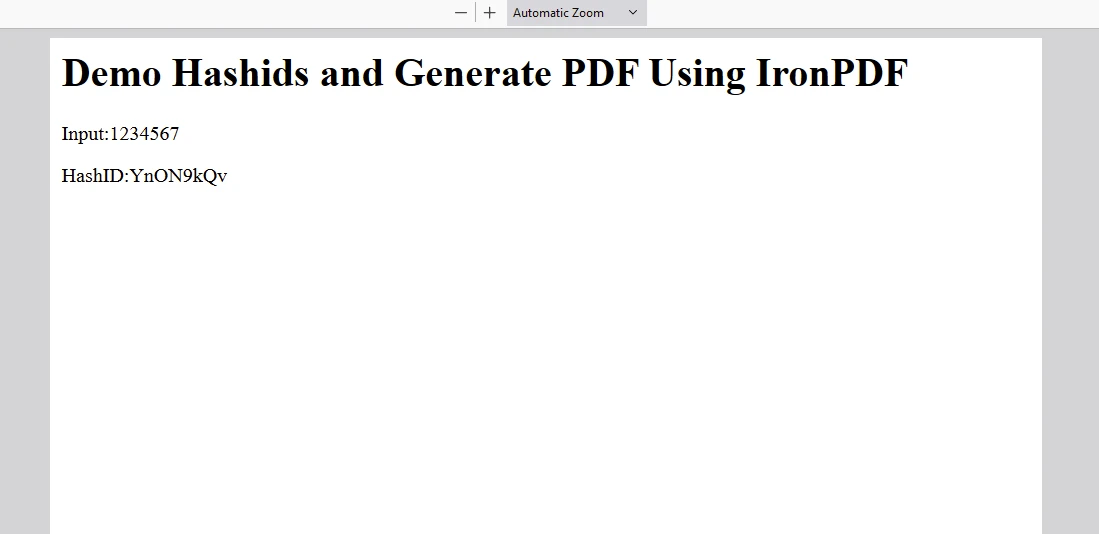
PDF Generation API: First step is to create a backend API to generate the PDF document. Since IronPDF only runs server side, we need to create an API to call when a user wants to generate a PDF. Create a file in path pages/api/pdf.js and add the below contents.
IronPDF requires a license key, you can get it from the license page and place it in the below code.
// pages/api/pdf.js
import {IronPdfGlobalConfig, PdfDocument} from "@ironsoftware/ironpdf";
// Apply your IronPDF license key
IronPdfGlobalConfig.getConfig().licenseKey = "Your license key";
export default async function handler(req, res) {
  try {
    const initHashids = new Hashids('IronPDF Is Awesome and this is the salt', 8);
    const f = req.query.f;
    const l = initHashids.encode(f);
    let content = "<h1>Demo Hashids and Generate PDF Using IronPDF</h1>"
    content+="<p>Input:"+f+"</p>";
    content+="<p>HashID:"+l+"</p>";
    const pdf = await PdfDocument.fromHtml(content);
    const data = await pdf.saveAsBuffer();
    console.error("data PDF:", data);
    res.setHeader("Content-Type", "application/pdf");
    res.setHeader(
      "Content-Disposition",
      "attachment; filename=awesomeIron.pdf",
    );
    res.send(data);
  } catch (error) {
    console.error("Error generating PDF:", error);
    res.status(500).end();
  }
}Now modify the index.js code as below to use the hashID and IronPDF
import Head from "next/head";
import styles from "../styles/Home.module.css";
import React, { useState, useEffect } from "react";
import Hashids from 'hashids';
export default function Home() {
  const [text, setText] = useState("");
  const [etext, seteText] = useState("");
  const [hashids, setHashids] = useState(null);
  useEffect(() => {
    const initHashids = new Hashids('IronPDF Is Awesome and this is the salt', 8);
    setHashids(initHashids);
  }, []);
  const generatePdf = async () => {
    try {
      const response = await fetch("/api/pdf-hash?f=" + text);
      const blob = await response.blob();
      const url = window.URL.createObjectURL(new Blob([blob]));
      const link = document.createElement("a");
      link.href = url;
      link.setAttribute("download", "awesomeIron.pdf");
      document.body.appendChild(link);
      link.click();
      link.parentNode.removeChild(link);
    } catch (error) {
      console.error("Error generating PDF:", error);
    }
  };
  const handleChange = (event) => {
    seteText(hashids.encode(event.target.value));
    setText(event.target.value);
  };
  return (
    <div className={styles.container}>
      <Head>
        <title>Generate PDF Using IronPDF</title>
        <link rel="icon" href="/favicon.ico" />
      </Head>
      <main>
        <h1>Demo Hashids and Generate PDF Using IronPDF</h1>
        <p>
          <span>Enter Url To get Hashids and Convert to PDF:</span>{" "}
        </p>
        <p>
          HashID of input: {etext}
        </p>
        <button style={{ margin: 20, padding: 5 }} onClick={generatePdf}>
          Generate PDF
        </button>
      </main>
      <style jsx>{`
        main {
          padding: 5rem 0;
          flex: 1;
          display: flex;
          flex-direction: column;
          justify-content: center;
          align-items: center;
        }
        footer {
          width: 100%;
          height: 100px;
          border-top: 1px solid #eaeaea;
          display: flex;
          justify-content: center;
          align-items: center;
        }
        footer img {
          margin-left: 0.5rem;
        }
        footer a {
          display: flex;
          justify-content: center;
          align-items: center;
          text-decoration: none;
          color: inherit;
        }
        code {
          background: #fafafa;
          border-radius: 5px;
          padding: 0.75rem;
          font-size: 1.1rem;
          font-family:
            Menlo,
            Monaco,
            Lucida Console,
            Liberation Mono,
            DejaVu Sans Mono,
            Bitstream Vera Sans Mono,
            Courier New,
            monospace;
        }
      `}</style>
      <style jsx global>{`
        html,
        body {
          padding: 0;
          margin: 0;
          font-family:
            -apple-system,
            BlinkMacSystemFont,
            Segoe UI,
            Roboto,
            Oxygen,
            Ubuntu,
            Cantarell,
            Fira Sans,
            Droid Sans,
            Helvetica Neue,
            sans-serif;
        }
        * {
          box-sizing: border-box;
        }
      `}</style>
    </div>
  );
}

Place the License Key here:
import {IronPdfGlobalConfig, PdfDocument} from "@ironsoftware/ironpdf";
// Apply your IronPDF license key
IronPdfGlobalConfig.getConfig().licenseKey = "Add Your key here";Integrating Hashids into your React application is a practical approach to safeguarding sensitive data like database IDs or URLs. By using Hashids, you can ensure that identifiers remain secure while maintaining the ability to retrieve original data when required.
Whether you're building a small application or a complex enterprise system, Hashids offers a reliable solution to enhance data privacy and security in your React projects and excels at encoding incremented numbers into unique hashes. Hashids ensures that even repeating patterns in input numbers result in distinct, non-repetitive hashes, maintaining data integrity and security in applications.
IronPDF stands out as a robust and versatile library for node.js developers seeking comprehensive PDF generation, manipulation, and management capabilities within their applications. Whether you're building web applications, desktop software, or integrating PDF functionality into enterprise solutions.