IronPDF on Blazor Server App (HTML to PDF Tutorial)

IronPDF is supported with .NET 6 and includes project types like Blazor. Using Visual Studio, you can add IronPDF to your Blazor Server App project and use it as demonstrated in the following example:
How to View PDFs in Blazor Server-side Applications
- Install the HTML-to-PDF Library for Blazor Applications
- Create a new Blazor Project in Visual Studio.
- Convert the web pages by URL into PDF documents
- Render the web pages into the client's web browser
- View PDF documents from HTML strings
Create a new Blazor server project
Create a new project and select the type Blazor Server App.

Install IronPDF into your Blazor project
After you have created the project, follow the next steps to install the IronPDF library from NuGet within Visual Studio.
- In the Solution Explorer window in Visual Studio, right-click
Referencesand chooseManage NuGet Packages. - Select Browse and search for
IronPdf. - Select the latest version of the package, check the checkbox for your project, and click install.
Alternatively,
Install-Package IronPdf
Add New Razor Component
Once IronPDF is installed in your Blazor project, start by adding a new Razor Component. For this tutorial, we will name it "IronPdfComponent":

After that, update the code as follows:
@page "/IronPdf" @inject IJSRuntime JS
<h3>IronPdfComponent</h3>
<EditForm Model="@_InputMsgModel" id="inputText">
    <div>
        <InputTextArea @bind-Value="@_InputMsgModel.HTML" rows="20" />
    </div>
    <div>
        <button onclick="@SubmitHTML">Render HTML</button>
    </div>
</EditForm>
@page "/IronPdf" @inject IJSRuntime JS
<h3>IronPdfComponent</h3>
<EditForm Model="@_InputMsgModel" id="inputText">
<div>
<InputTextArea @bind-Value="@_InputMsgModel.HTML" rows="20" />
</div>
<div>
<button onclick="@SubmitHTML">Render HTML</button>
</div>
</EditForm>@code {
InputHTMLModel _InputMsgModel = new InputHTMLModel();
private async Task SubmitHTML()
{
IronPdf.License.LicenseKey = "IRONPDF-MYLICENSE-KEY-1EF01";
var render = new IronPdf.ChromePdfRenderer();
var doc = render.RenderHtmlAsPdf(_InputMsgModel.HTML);
var fileName = "iron.pdf";
using var streamRef = new DotNetStreamReference(stream: doc.Stream);
await JS.InvokeVoidAsync("SubmitHTML", fileName, streamRef);
}
public class InputHTMLModel
{
public string HTML { get; set; } = "My new message";
}
}@code {
InputHTMLModel _InputMsgModel = new InputHTMLModel();
private async Task SubmitHTML()
{
IronPdf.License.LicenseKey = "IRONPDF-MYLICENSE-KEY-1EF01";
var render = new IronPdf.ChromePdfRenderer();
var doc = render.RenderHtmlAsPdf(_InputMsgModel.HTML);
var fileName = "iron.pdf";
using var streamRef = new DotNetStreamReference(stream: doc.Stream);
await JS.InvokeVoidAsync("SubmitHTML", fileName, streamRef);
}
public class InputHTMLModel
{
public string HTML { get; set; } = "My new message";
}
}code
If True Then
Dim _InputMsgModel As New InputHTMLModel()
'INSTANT VB TODO TASK: Local functions are not converted by Instant VB:
' private async Task SubmitHTML()
' {
' IronPdf.License.LicenseKey = "IRONPDF-MYLICENSE-KEY-1EF01";
' var render = New IronPdf.ChromePdfRenderer();
' var doc = render.RenderHtmlAsPdf(_InputMsgModel.HTML);
' var fileName = "iron.pdf";
' var streamRef = New DotNetStreamReference(stream: doc.Stream);
' await JS.InvokeVoidAsync("SubmitHTML", fileName, streamRef);
' }
'INSTANT VB TODO TASK: Local functions are not converted by Instant VB:
' public class InputHTMLModel
' {
' public string HTML
' {
' get;
' set;
' } = "My new message";
' }
End IfAdd this JavaScript code to _layout.cshtml to allow downloading of the PDF rendered by IronPDF in the Blazor Application:
<script>
    window.SubmitHTML = async (fileName, contentStreamReference) => {
        const arrayBuffer = await contentStreamReference.arrayBuffer();
        const blob = new Blob([arrayBuffer]);
        const url = URL.createObjectURL(blob);
        const anchorElement = document.createElement("a");
        anchorElement.href = url;
        anchorElement.download = fileName ?? "";
        anchorElement.click();
        anchorElement.remove();
        URL.revokeObjectURL(url);
    };
</script>
<script>
window.SubmitHTML = async (fileName, contentStreamReference) => {
const arrayBuffer = await contentStreamReference.arrayBuffer();
const blob = new Blob([arrayBuffer]);
const url = URL.createObjectURL(blob);
const anchorElement = document.createElement("a");
anchorElement.href = url;
anchorElement.download = fileName ?? "";
anchorElement.click();
anchorElement.remove();
URL.revokeObjectURL(url);
};
</script>Edit the NavMenu.razor file in the Shared folder to include a navigation tab to our new Razor component. Add the following code:
<div class="nav-item px-3">
    <NavLink class="nav-link" href="IronPdf">
        <span class="oi oi-list-rich" aria-hidden="true"></span> IronPdf
    </NavLink>
</div>
<div class="nav-item px-3">
<NavLink class="nav-link" href="IronPdf">
<span class="oi oi-list-rich" aria-hidden="true"></span> IronPdf
</NavLink>
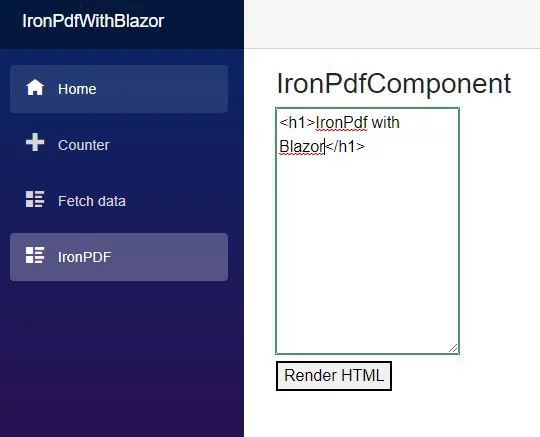
</div>Once this has all been applied, we can run our solution, and you should see this: